
Compound Direct Order Workflows: Streamlining pharmacy operations

Order Workflows in Compound Direct streamline your pharmacy operations by automating and standardising order management across every stage, from quoting and payment to patient risk assessments and order fulfilment. Workflows ensure consistency, reduce manual effort, and improve communication throughout the process. With a clear structure and automated system, Compound Direct enables your pharmacy to operate more efficiently, minimise errors, and provide a seamless, reliable experience for both staff and patients.
This blog explains the importance of order workflows in pharmacy operations, outlines the key components needed to build an effective workflow, provides a step-by-step guide to creating one, and shows you how these workflows are applied in premium sites.
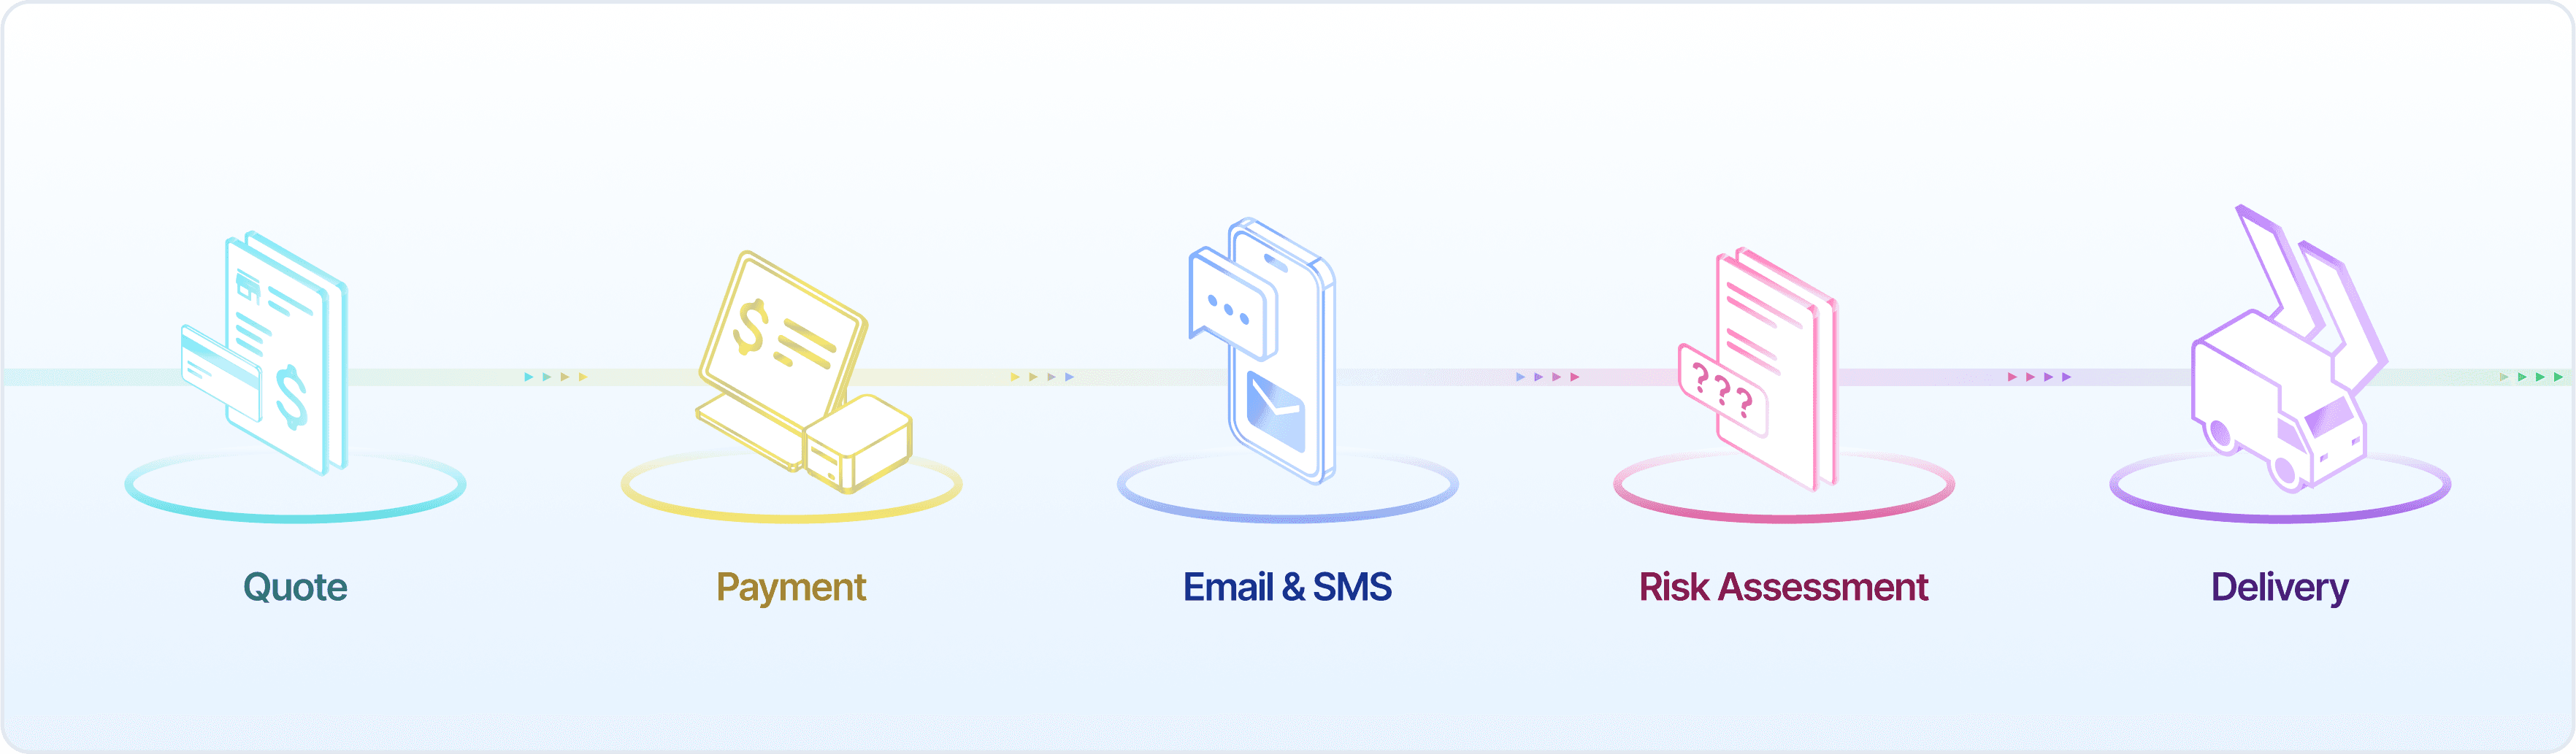
Understanding order workflows
Order Workflows provide a structured process that controls how orders are managed from start to finish. They trigger processes at each stage of the order journey, ensuring tasks are completed in the correct sequence and communication remains consistent across all orders.
Compound Direct workflows automate communication and simplify the process by integrating payment and risk assessment links directly into each workflow. They also support flexibility by handling various payment methods and delivery options, whether the patient is in-store, placing an order online, or receiving their order through a clinic. This integrated approach streamlines operations, enhances convenience, and ensures a seamless experience for both pharmacies and patients.
Before you begin
Before setting up an Order Workflow, we recommend preparing several components in advance. Workflows may integrate Invoice Templates, Accounts, Risk Assessment Surveys, and Shipping & Pickup Options, which are often sent using Email and SMS Templates. To ensure a smooth setup process, it’s best to prepare these components before building your workflows.
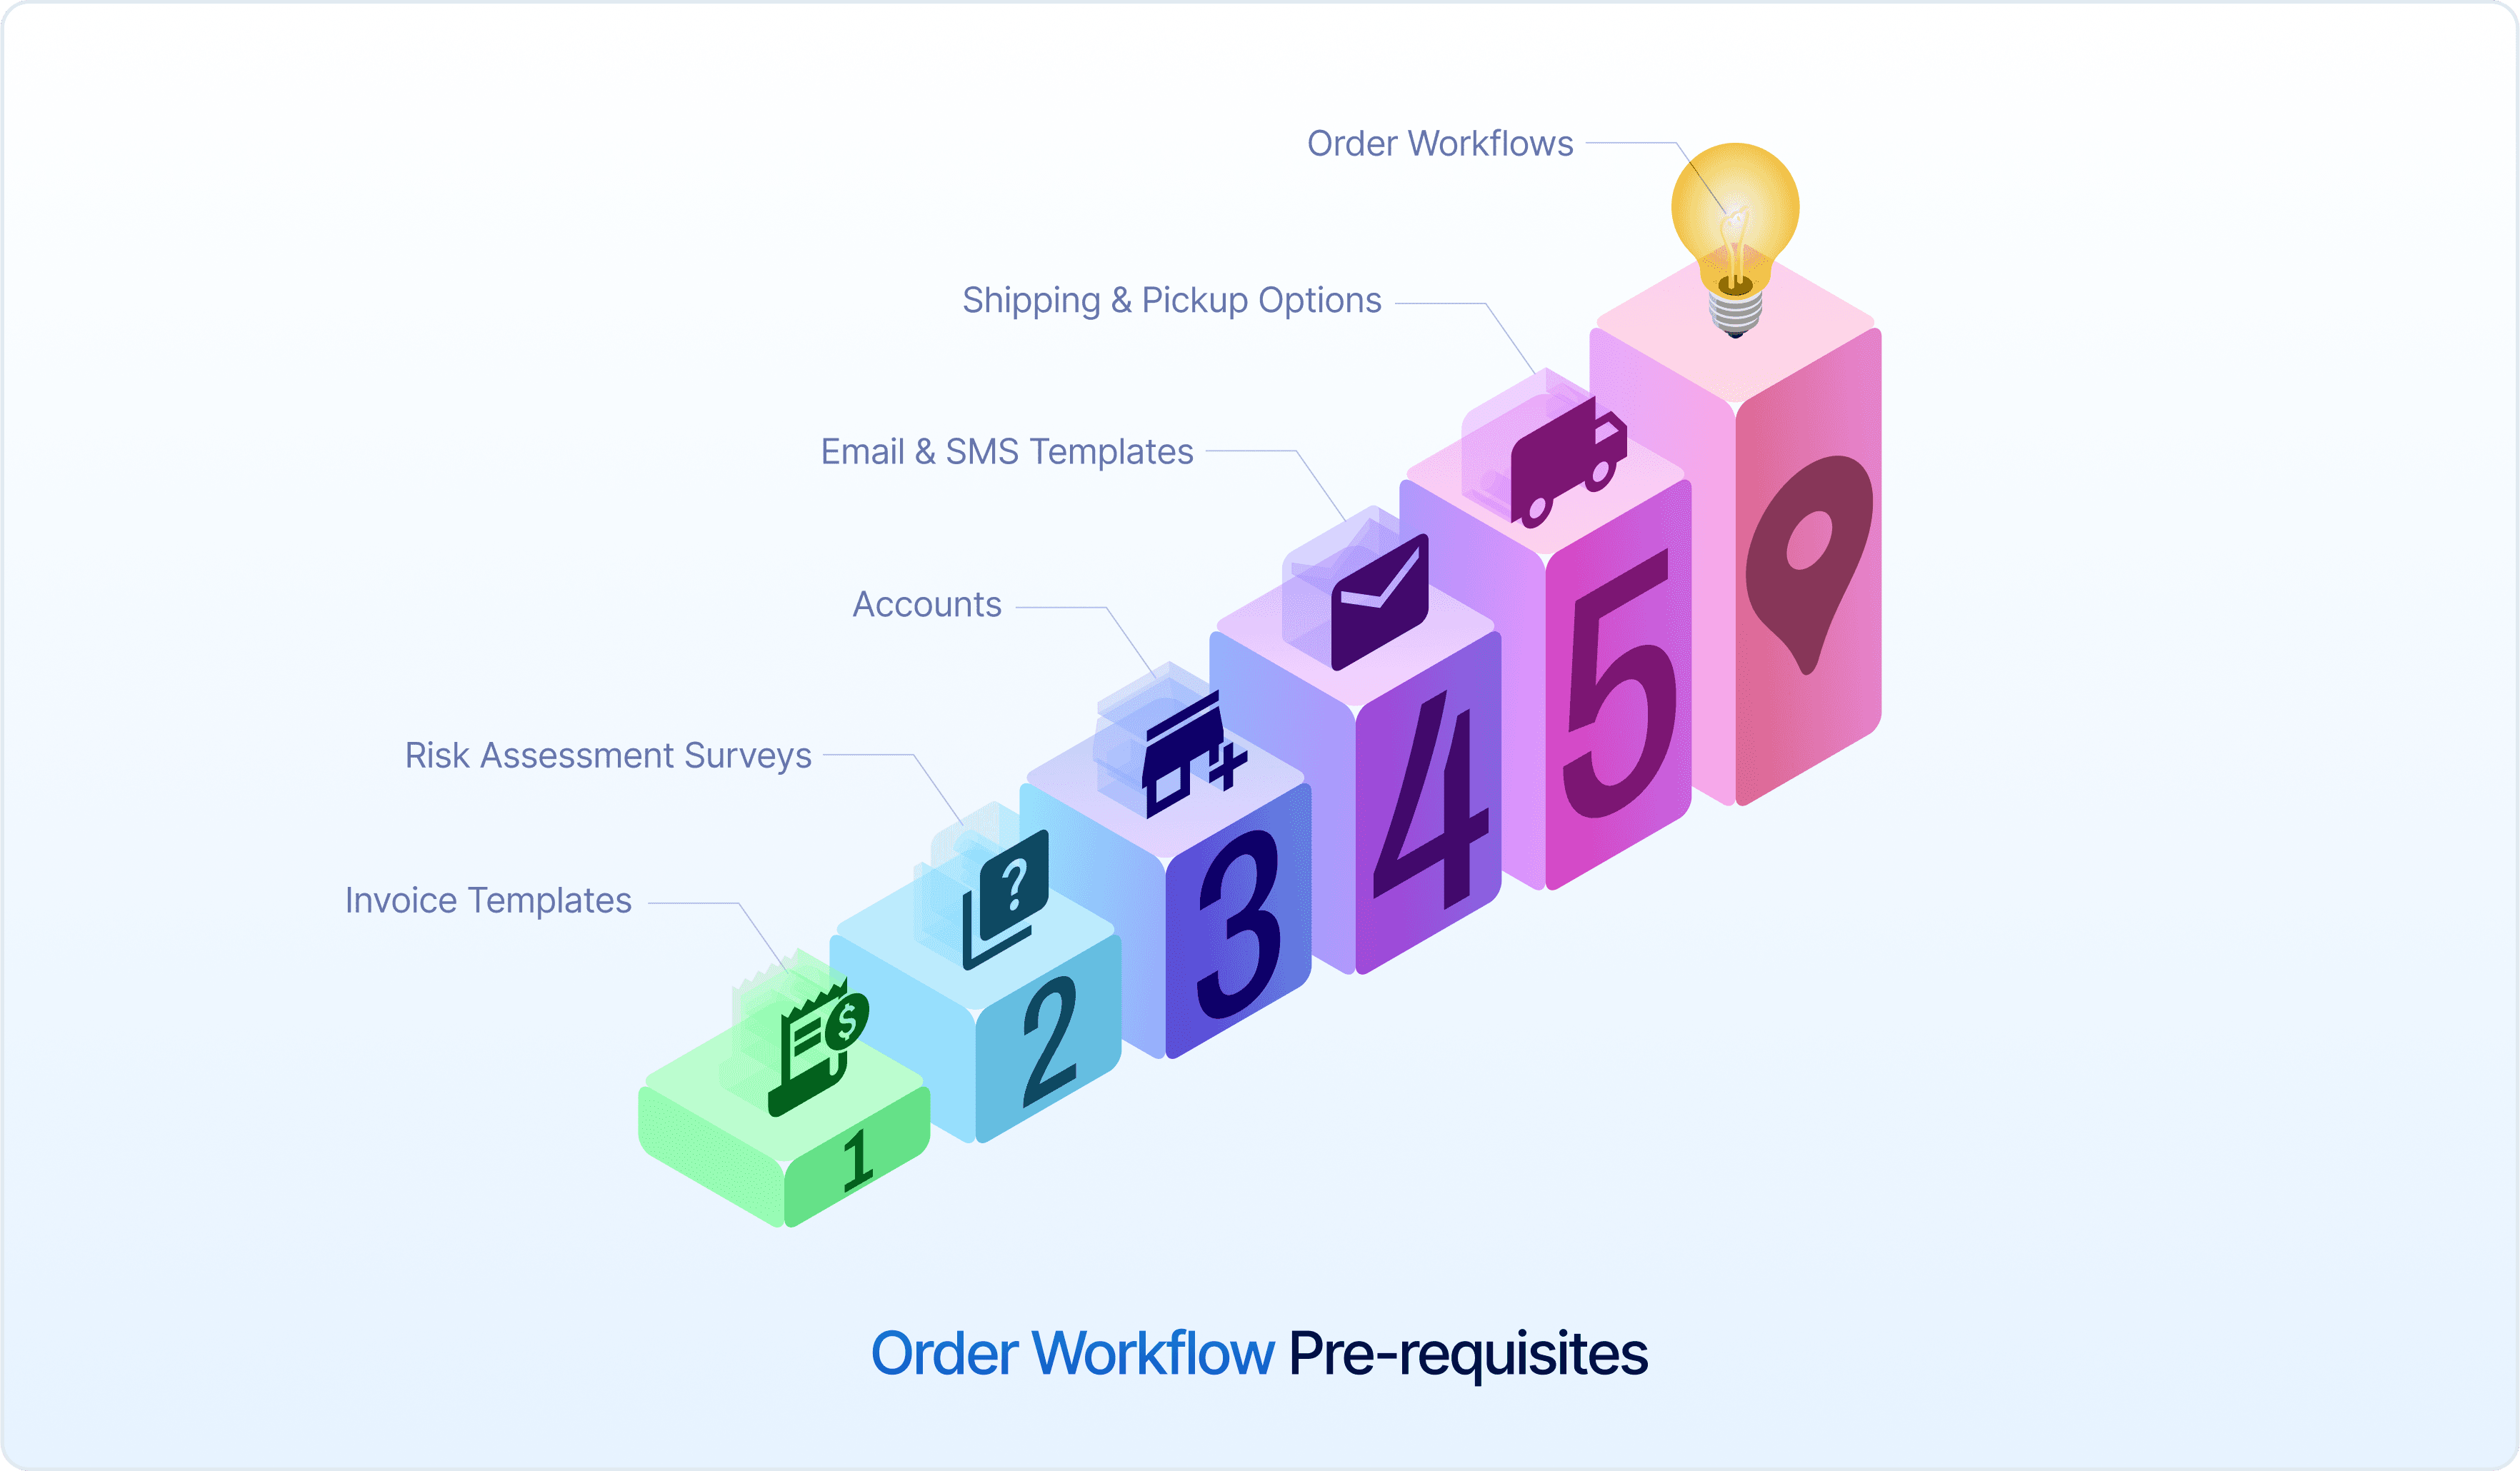
1. Invoice Templates
Invoice Templates in Compound Direct are used to send receipts or tax invoices to customers once payment is complete. Creating reusable invoice templates allows you to save default preferences for the invoices you send, including preset notes, tax and shipping options, and the preferred delivery method for your customers. This provides flexibility and ensures that each invoice follows the correct format for your workflow.
2. Risk Assessment Surveys
Risk Assessment Surveys in Compound Direct allow pharmacies to send electronic medical history forms via SMS, email, or both, with customer responses populating directly into the patient record. These surveys help identify potential health risks, support safer dispensing, and enable more personalised consultations, improving overall medication management and patient outcomes.
To give you a walkthrough on how to set up Risk Assessment Surveys, see our blog: Automate patient medical history by sending risk assessment links.
3. Accounts
Accounts in Compound Direct provide a centralised place to view balances, record payments, manage financial records, and track billing histories for each customer or clinic. Using Accounts effectively ensures invoices are accurate, payments are recorded promptly, and financial data remains consistent across all orders and transactions.
4. Email & SMS Templates
Email and SMS Templates in Compound Direct standardise communication used within workflows and allow you to tailor messaging to suit your pharmacy. Understanding and preparing these templates beforehand ensures clear, consistent, and professional communication throughout the order process.
To learn how these templates are set up and used in order workflows, see our blog: Compound Direct Email & SMS Templates: Standardise pharmacy communication.
5. Shipping and pickup options
If your workflow includes pickup, delivery or shipping options, it is recommended that these are set up ahead of time. This ensures that the correct methods, such as courier or postal services, and any tax requirements that must be included in the shipping cost, are available when the order workflow is created.
Although pickup and shipping options can be added when setting up a workflow, preparing these options in advance ensures accurate delivery information and prevents interruptions when setting up your workflow.
To learn more about adding shipping and pickup options, see our blog: Compound Direct Order Delivery: A guide to pickup and shipping options.
Setting up an order workflow
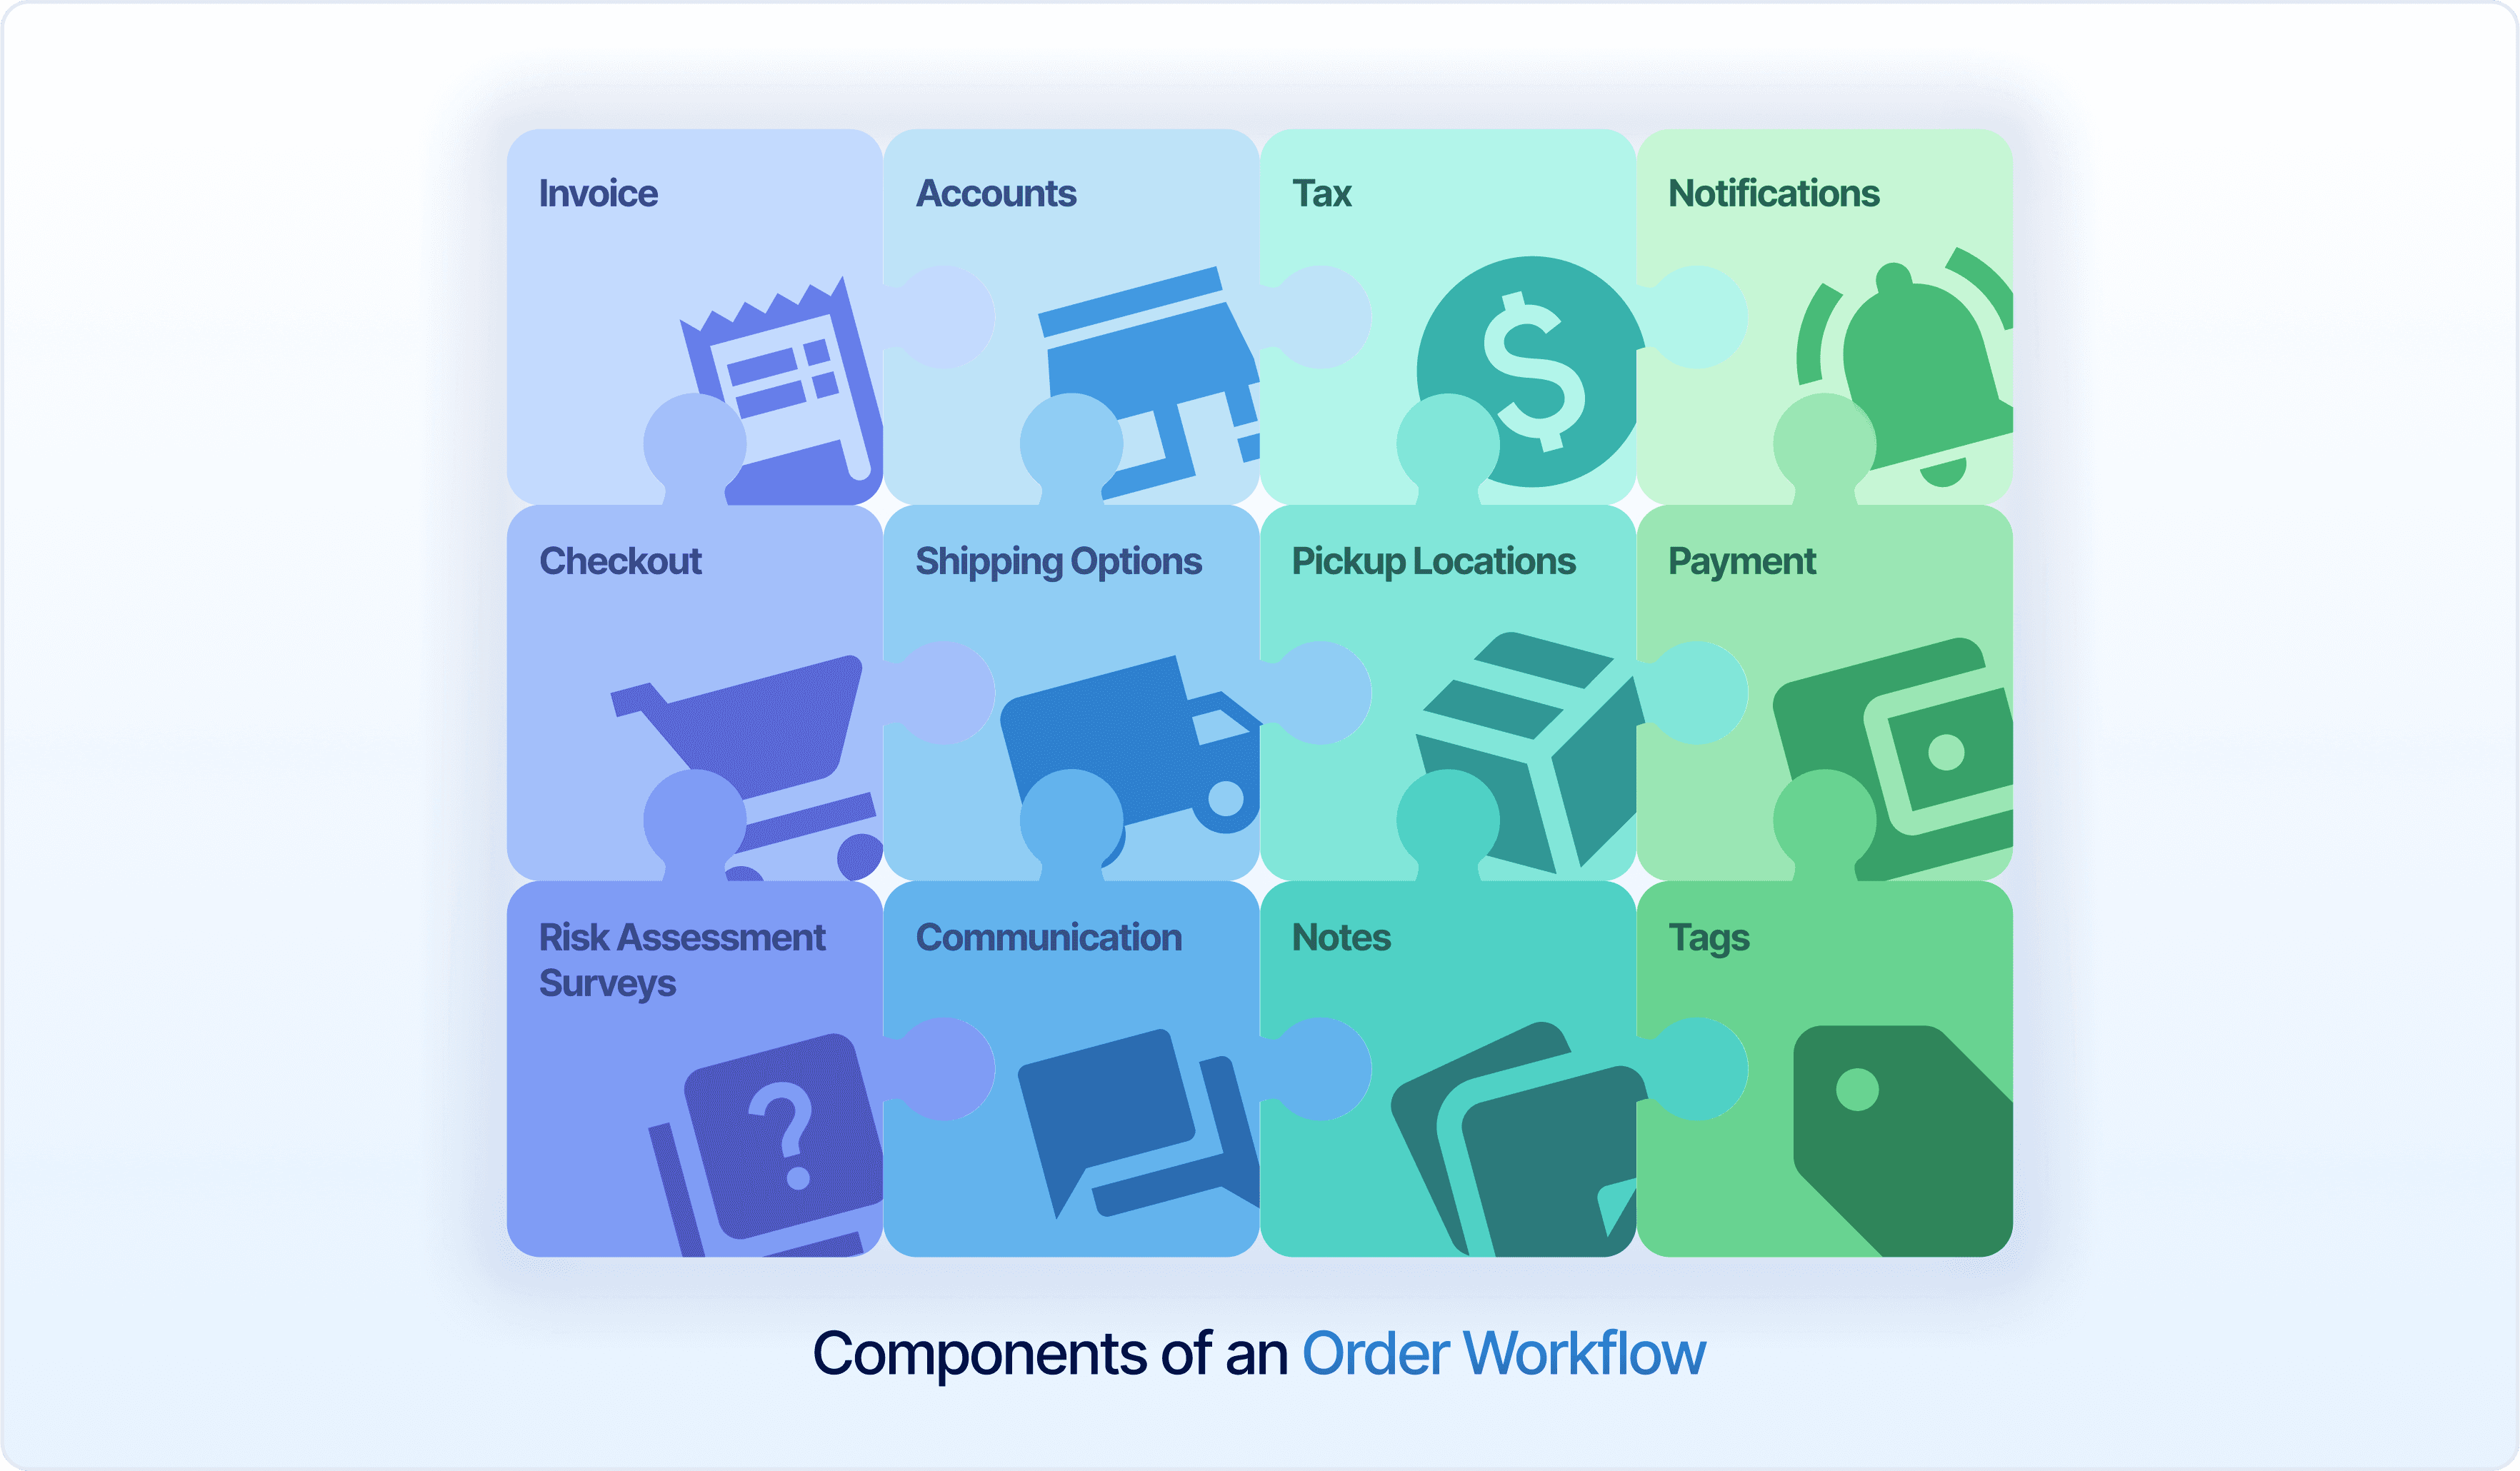
Setting up an Order Workflow is all about choosing the right pieces and putting them together in a way that works for your pharmacy. Think of it like building a puzzle. Each piece plays a role in shaping the full picture of how your workflow will run.
As you configure your workflow, every component matters. You’ll decide how orders come in, how payments are completed, how customers are notified, and how orders are collected once they’re ready. All of these configurations help you create a workflow that fits the unique rhythm of your pharmacy and supports a smooth experience for both your team and your customers.
Step 1: Configure workflow basics
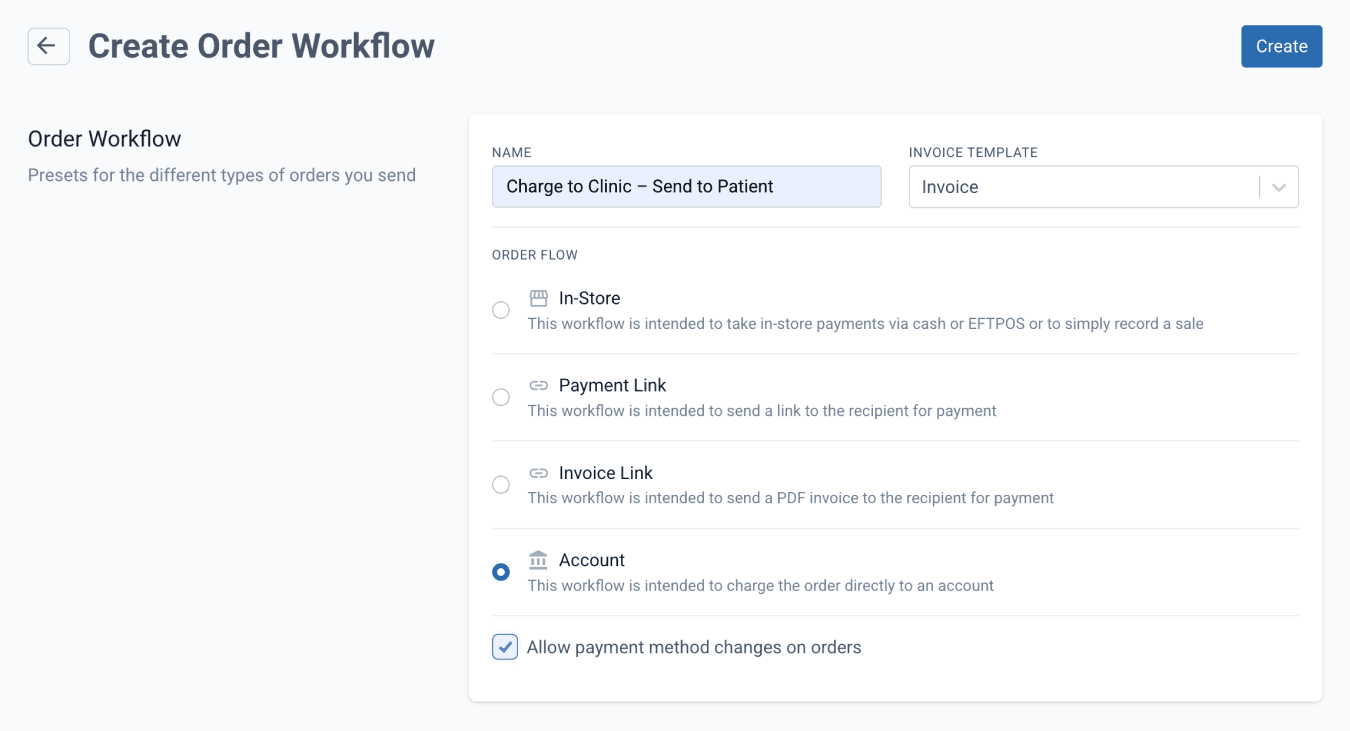
Workflow name
The name of your workflow should clearly indicate the type of process it represents, allowing staff to easily distinguish it from other workflows. For example, if the workflow is intended for remote orders that will be shipped, you might name it Remote Order - Shipping. If the workflow is for orders billed to a clinic account but delivered to the customer, you could name it Charge to Clinic - Send to Patient.
Invoice Template
Choose the invoice template for this workflow. Invoice templates are required when issuing a tax invoice or receipt and help ensure documentation is consistent and accurate. Select the template that best suits your workflow, such as account statements, medication history, pharmacy receipts, or tax invoices, to support clear and efficient billing.
Order Flow (Payment method)
Select the default payment method best suited to this workflow:
- In-store
Use this workflow when payment will be taken in person via cash, EFTPOS, or when simply recording an over-the-counter sale. - Payment Link
Use this workflow when you want to send a secure payment link to the recipient. This sends a quote and purchase link, allowing the customer to review their order, complete payment, select shipping or pickup details, and complete any required risk assessment surveys online. This is especially useful for online orders where customers prefer to review and confirm their order before payment. - Invoice Link
Use this workflow when you want to send a copy of the tax invoice to the customer for payment outside the platform. - Account
Use this workflow when the order is intended to be charged directly to an account.
Tick ‘Allow payment method changes on orders’ to allow the payment method to be edited, even when an order workflow has been selected.
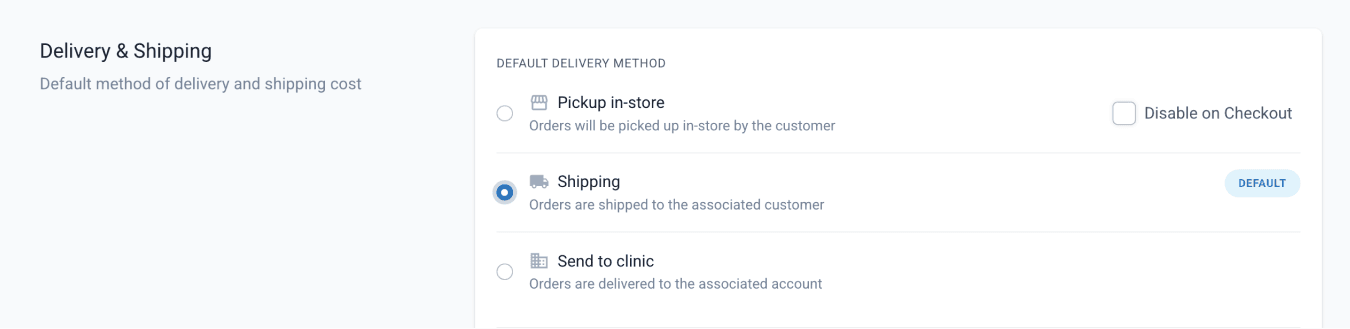
Step 2: Select the default delivery method
Selecting a default shipping option will automatically pre-select that method when an order is created. This does not limit the available choices because pharmacy staff can still change the shipping option during order creation, and customers can choose a different option when completing their delivery details through the purchase link. This provides convenience while maintaining flexibility for both staff and customers.
If the default payment method is Payment Link, the option to ‘Disable on Checkout’ will appear. If the workflow should not include a pickup option, tick the ‘Disable on Checkout’ checkbox to remove in-store pickup from the available delivery methods during checkout.
Step 3: Customise shipping and pickup options
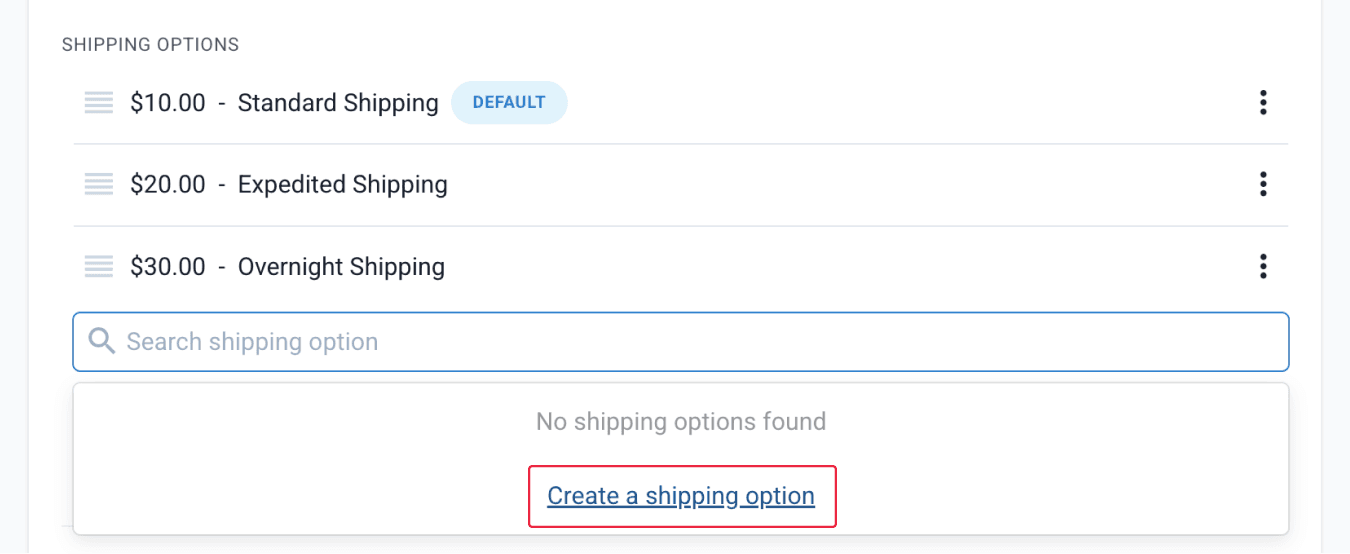
Adding a shipping option with set prices provides customers with details such as the courier used and the cost of delivery. You can add multiple shipping options and choose which one should be selected by default.
The ‘Create a shipping option’ button appears when no shipping options are available or when all existing shipping options have already been selected.
Set up pickup locations by clicking the ‘Add Pickup Location’ button. This button appears only if no pickup locations currently exist in your workspace. If pickup locations already exist, they will be displayed here instead.

To learn more about pickup locations, see our blog: Compound Direct Order Delivery: A guide to pickup and shipping options.
Step 4: Select billing account

Default billing account
If the payment method is Account, you may select a default account which will be automatically associated with orders created using that workflow. This helps you charge orders to the correct account based on your charge trigger settings, saving time by removing the need to manually select the account when preparing each order.
Tick ‘Set Account as Invoice Recipient’ to automatically send a copy of the invoice to the account holder for all orders billed to that account.
Step 5: Set up tax settings
Decide whether orders processed through this workflow are taxable. Tick ‘Taxable’ to ensure that tax is applied to the items in the order. If the items are taxable, determine tax inclusion. Tick ‘Tax is inclusive’ if the item price already includes tax. If this is not selected, tax will be added on top of the item price during checkout.

Step 6: Set up checkout settings
Checkout settings will appear when Payment Link is selected as default payment method. When a customer checks out using a payment link, it is important that checkout settings are set up to polish the checkout process and to add extra precautions and flexibility prior to checkout.

Enabling ‘Line items editable’ will allow customers to remove or decrease OTC and prescription items, and increase the quantity of OTC items before checking out.
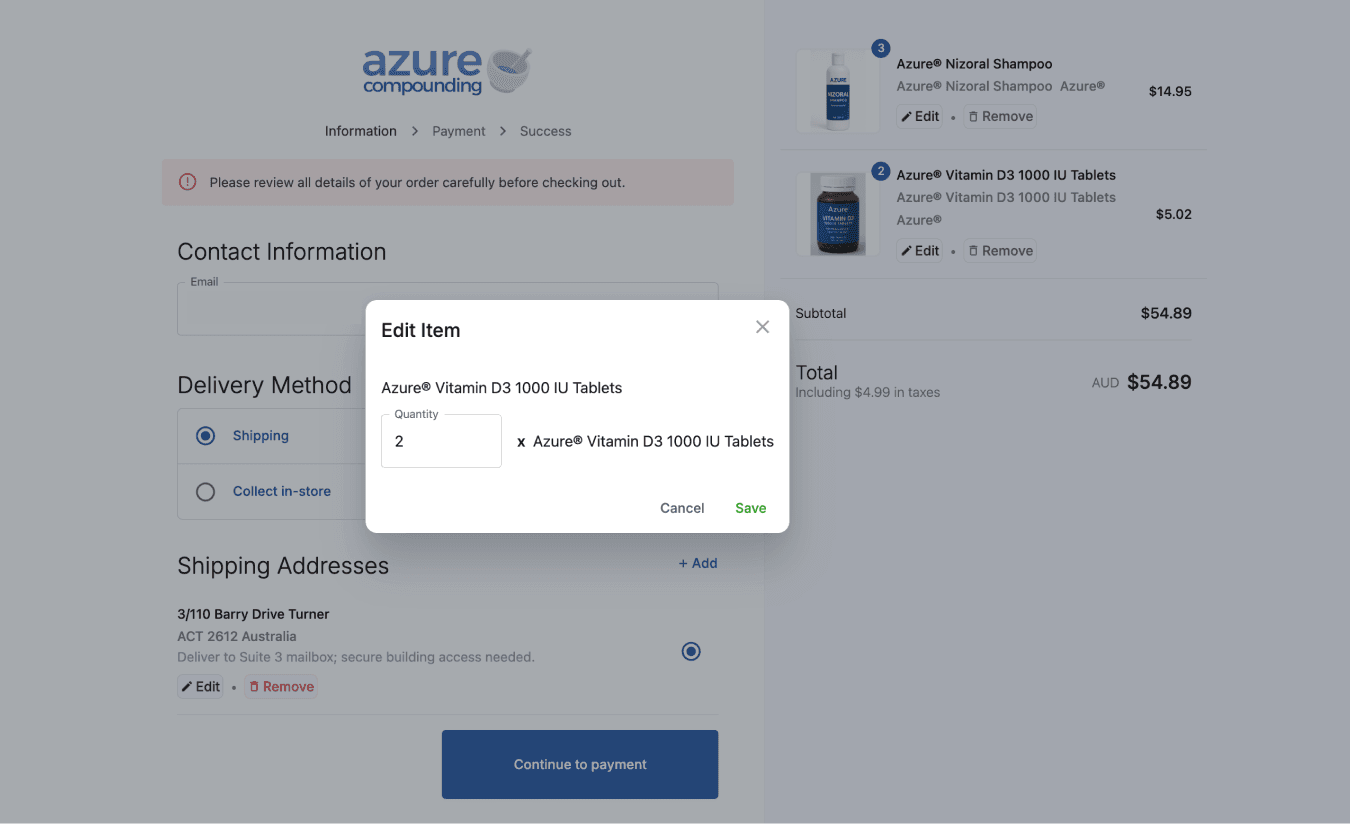
‘Enable Invoice Download’ allows customers to download their invoice or pharmacy receipt after checking out. The invoice will also be included in the fulfilment emails. Some pharmacies prefer the tax invoice download to be disabled during checkout and instead include the invoice with fulfilment, as invoices generated at checkout may not yet contain complete details such as the script number.
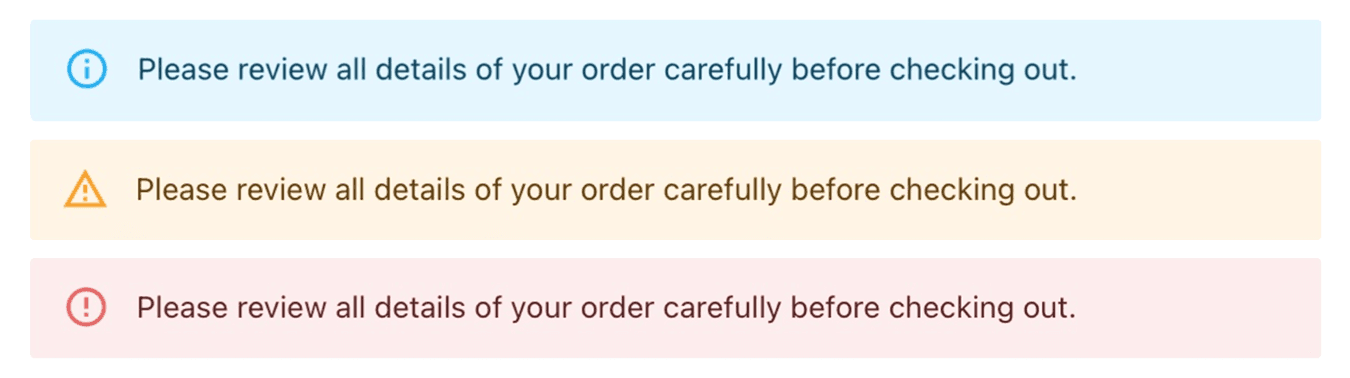
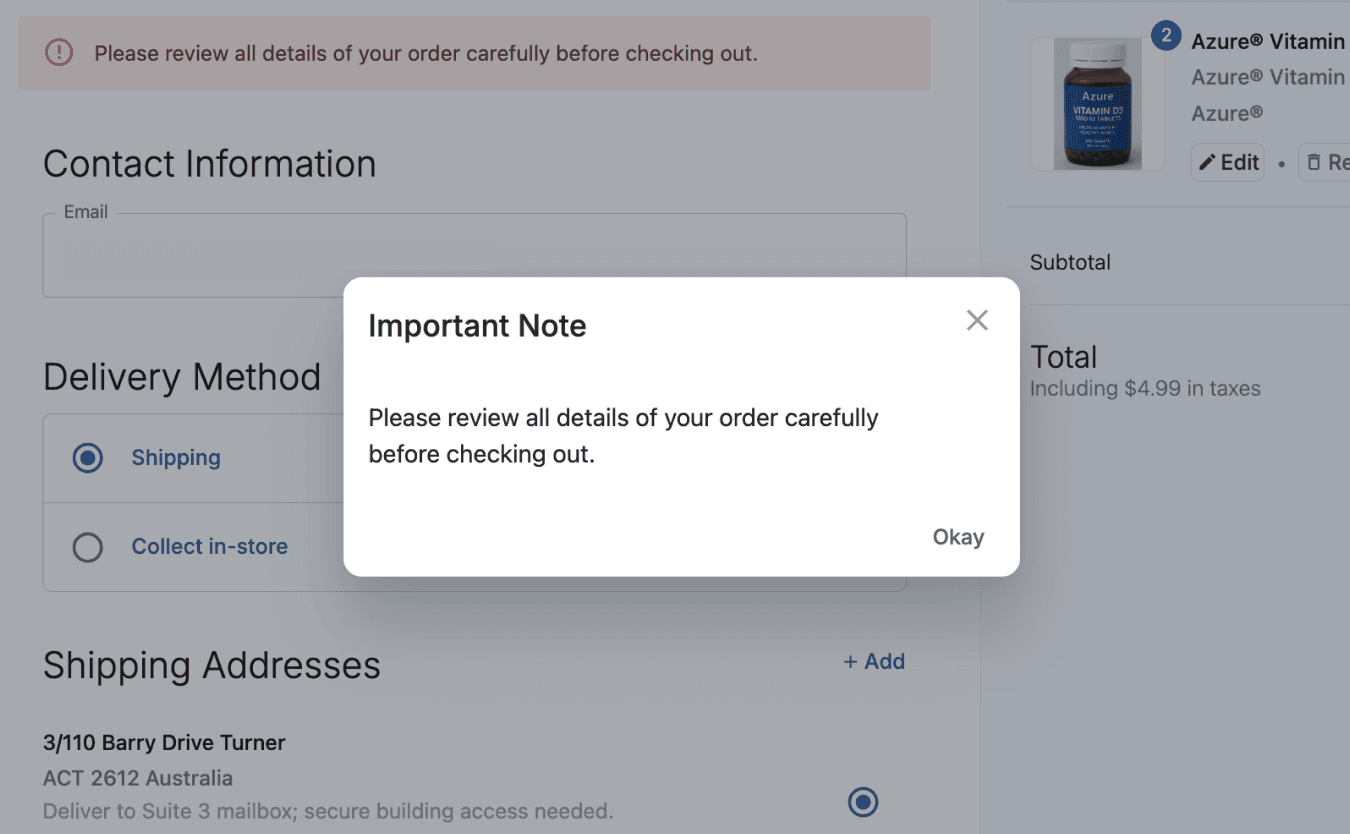
Placing a ‘Checkout Note’ will be helpful for adding reminders for customers before they complete their purchase. Select the ‘Checkout Note Importance’ to customise how the message will be displayed on the purchase link.
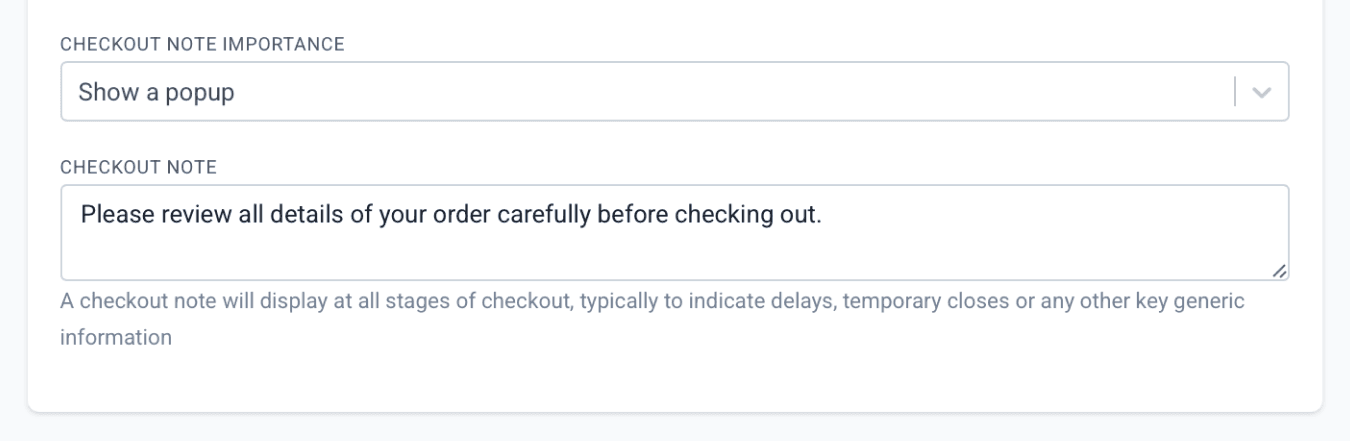
A ‘Default’ note importance will display the note in blue, a ‘Medium’ importance will display it in yellow, and a ‘High’ importance will display it in red. Selecting ‘Show a popup’ will display the note in a popup when the purchase link is opened.
Step 7: Select a risk assessment survey
Risk Assessment Surveys are sent along with the purchase link when the selected payment method is online. Select the appropriate survey using the drop-down menu, which displays all surveys that have been prepared in advance.
If the patient is marked as veterinary, a risk assessment will not be sent.
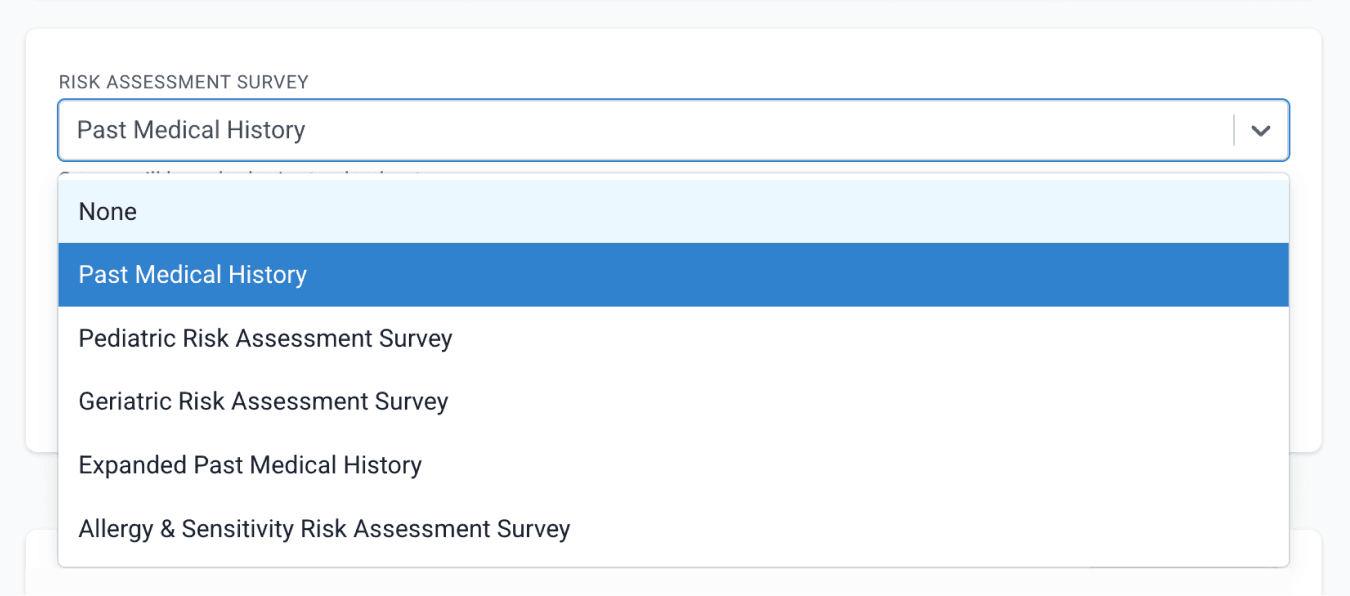
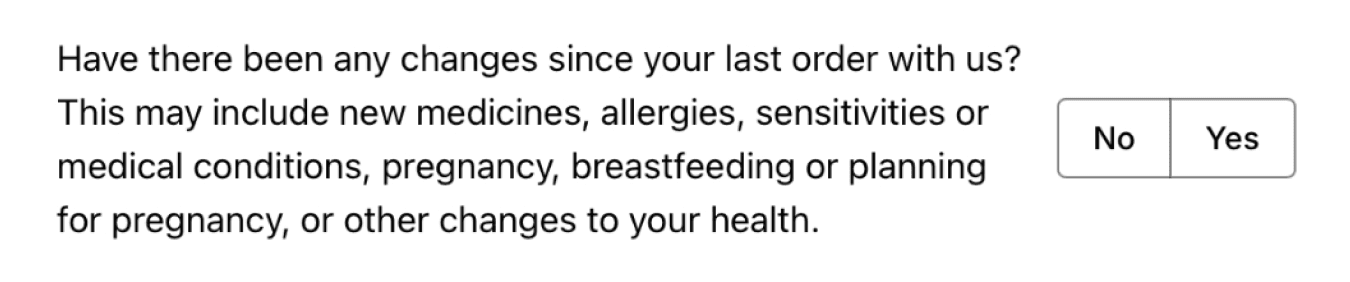
You can also add a Risk Assessment Survey Prompt, which is useful for confirming whether there have been any changes since the customer’s last order if they have previously completed a risk assessment.
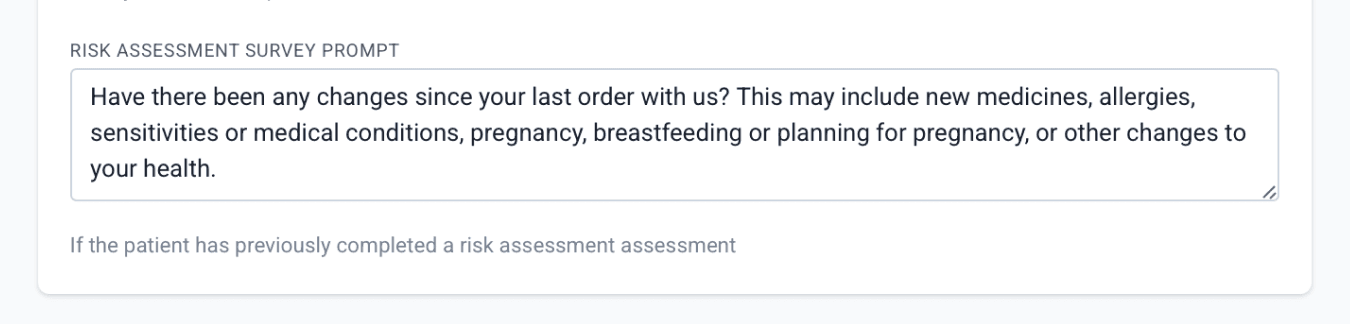
The prompt will be displayed before the patient begins the survey. If the patient answers ‘No’, the survey will be skipped, and they may proceed directly to payment.
Step 8: Set up communication settings
Customise how and when customers receive updates about their orders. Choose which automated messages are sent when an order is confirmed, fulfilled, or requires a reminder. These notifications use pre-set Email and SMS templates that have been tailored to suit your pharmacy’s preferences.
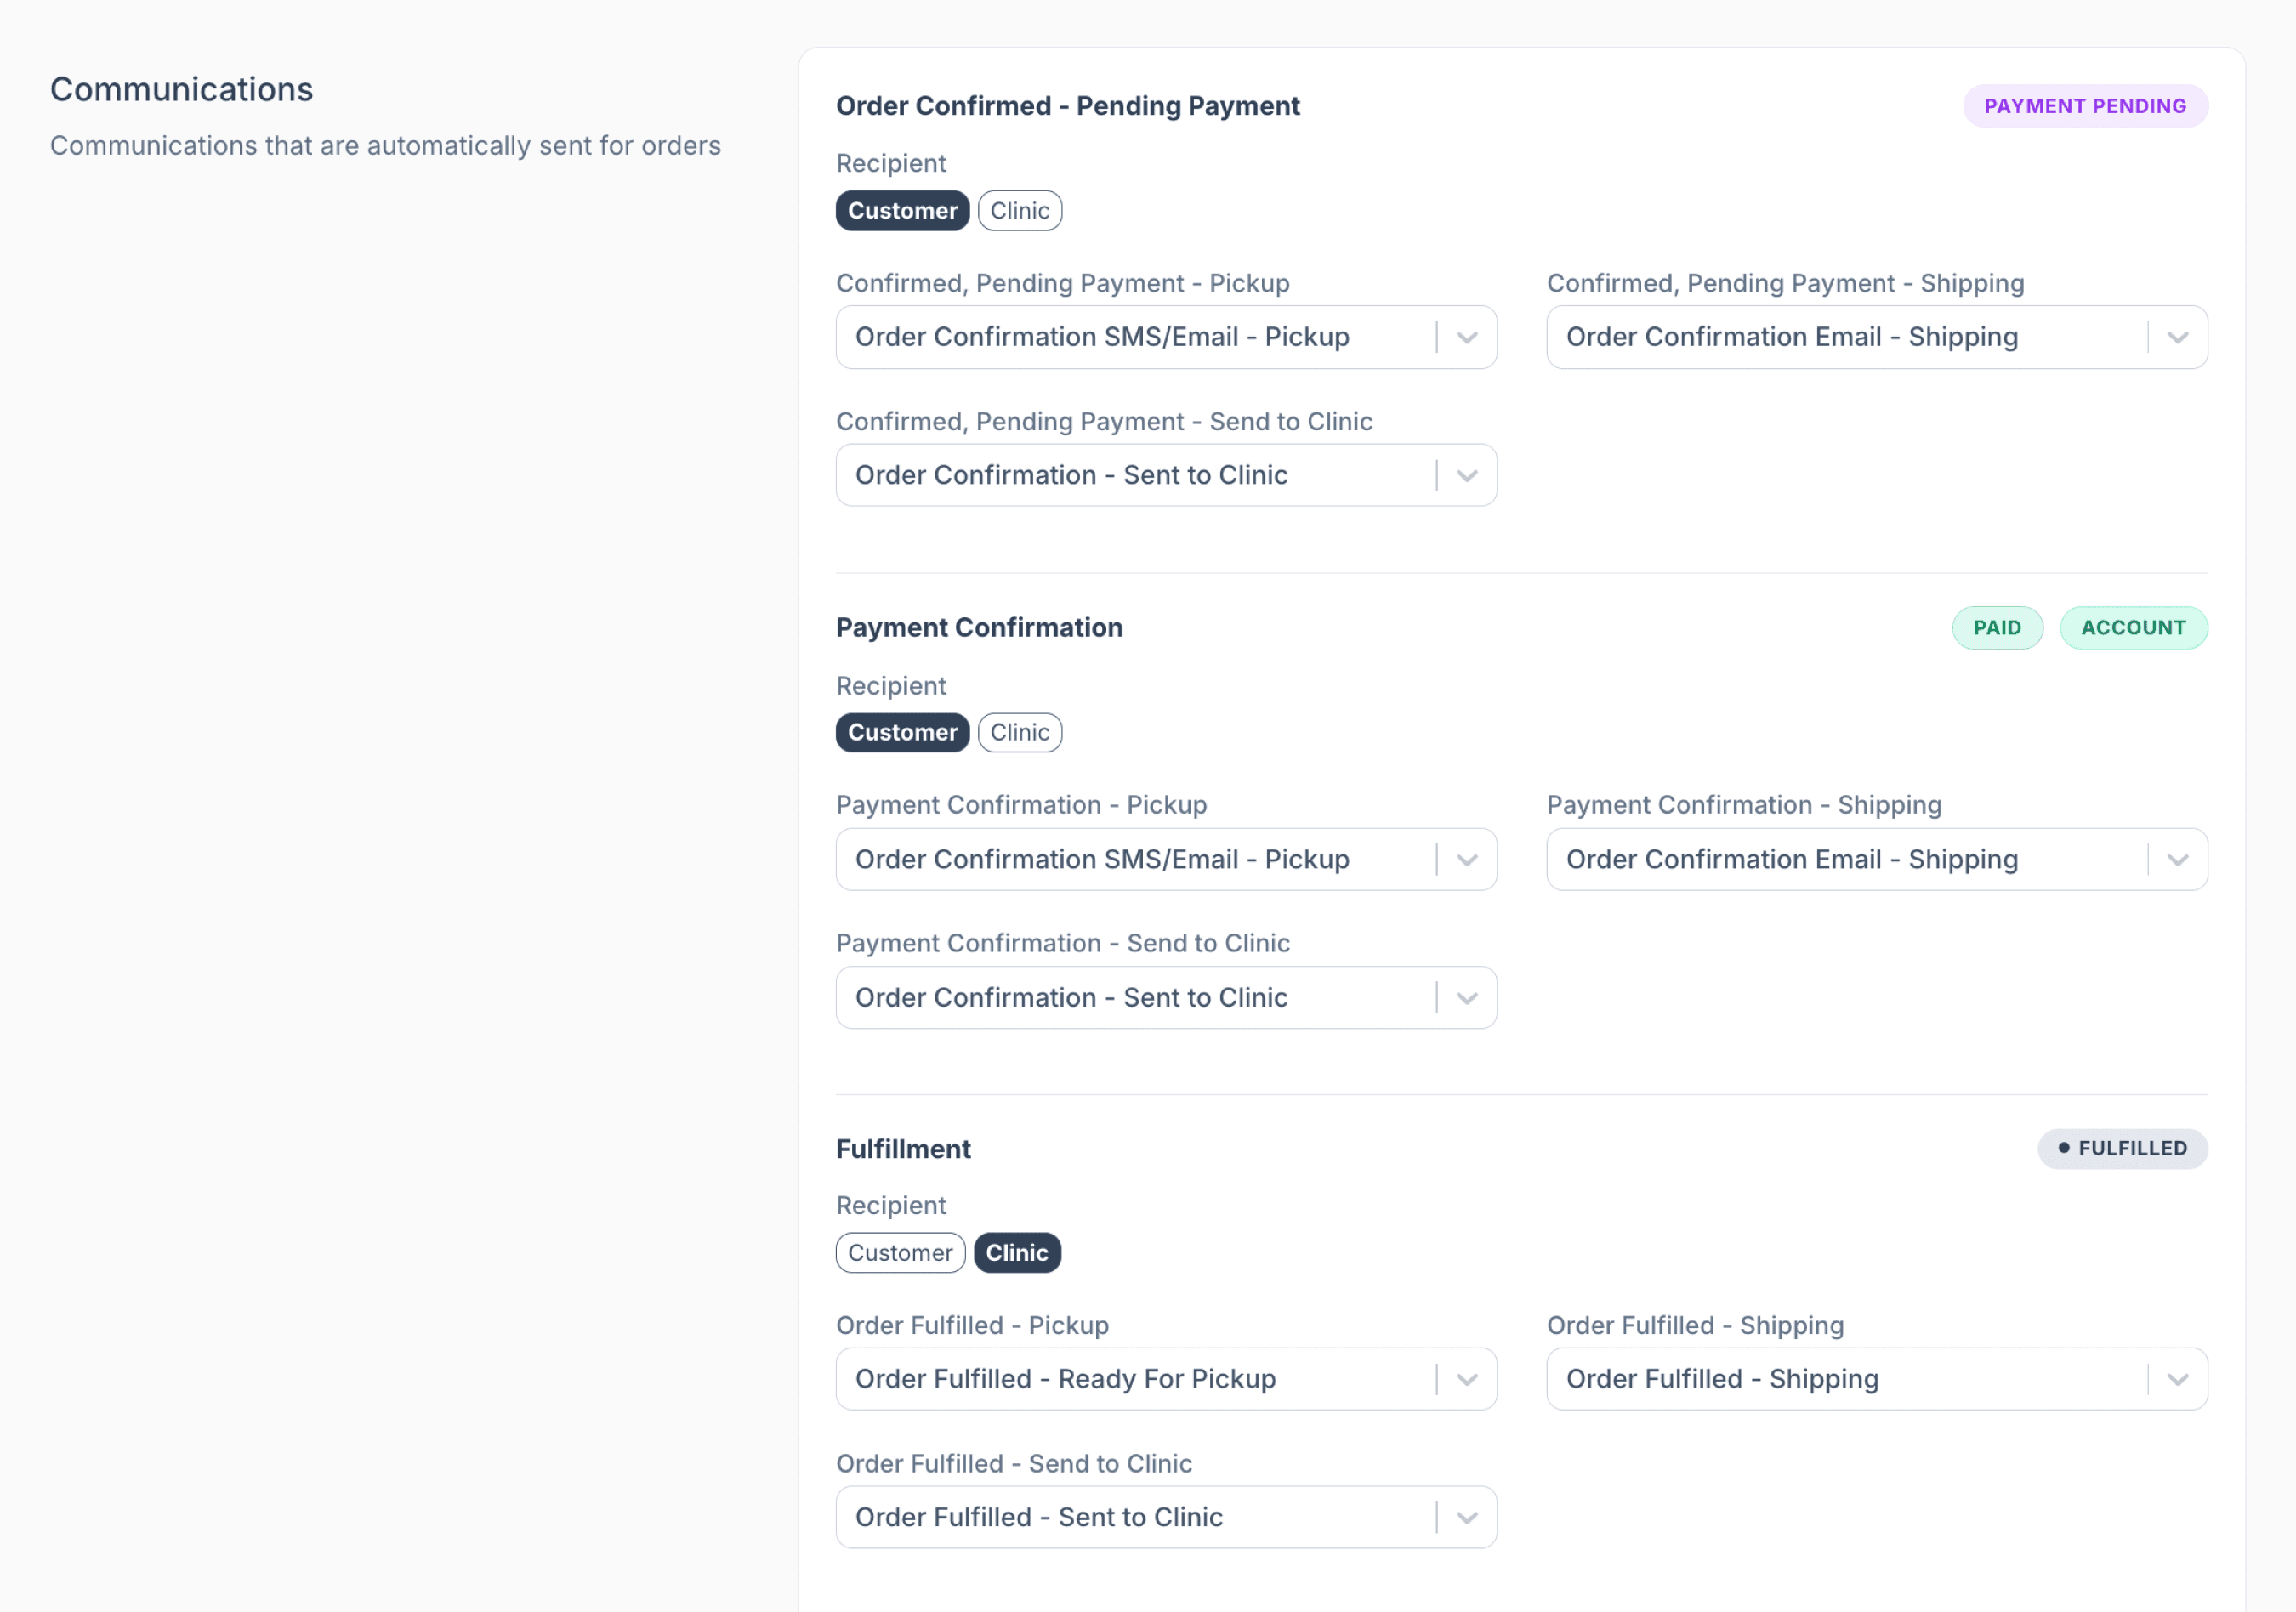
To set up automatic Order Confirmation or Order Fulfilment messages, first choose whether the Customer or Clinic should receive the correspondence. This makes it easier to configure communications for pharmacy to clinic workflows.
You can then select which delivery methods, such as Pickup, Shipping, or Send to Clinic, should trigger an Email or SMS notification. Choose the relevant template from the drop-down menu, or leave it set to None if no message should be sent for that method.
Important notes:
- Once an order has been marked pending payment, the order is considered confirmed and will send a message to the patient using the template selected.
- Once an order has been marked paid, or has completed payment via In-store, Online, or through an Account, the selected recipient will receive a payment confirmation message.
- The communication settings do not limit the delivery options available for an order. Pickup, shipping, and clinic shipping methods will still appear as options regardless of whether these communications are set up. For this reason, it is recommended to configure all communication settings if all delivery methods are applicable.
Step 9: Invoice delivery settings
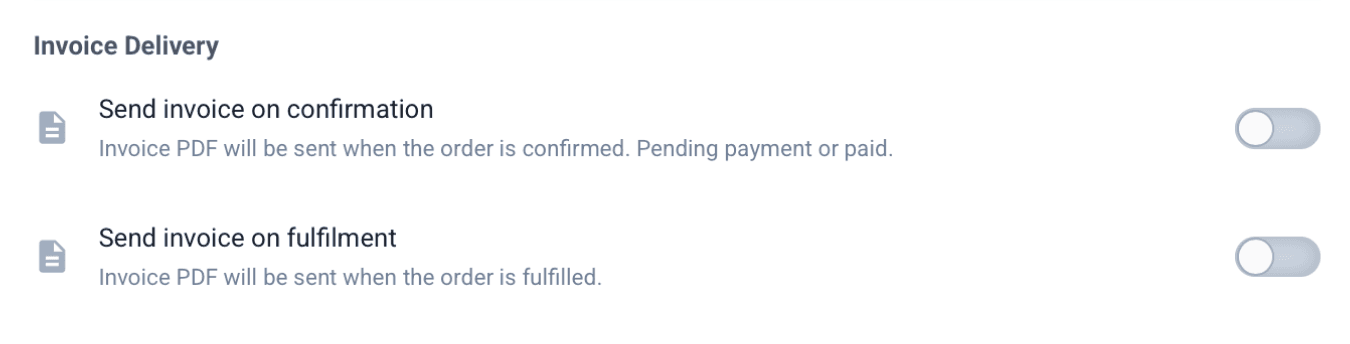
Invoice delivery settings give you greater control over when invoices are automatically sent. You can choose to send an invoice upon order confirmation or at fulfilment.
Step 10: Order pending reminder settings
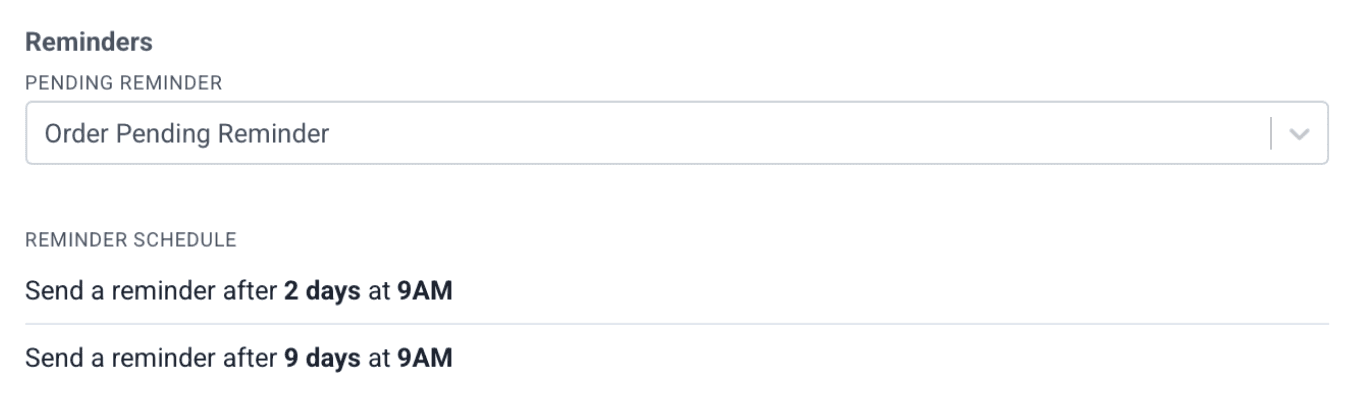
To enable an automatic Order Pending Reminder, select the appropriate Email/SMS template from the drop-down menu. This allows the customer to receive a reminder to complete a pending prescription order that has already been sent. Reminders are automatically sent 2 days and 9 days at 9am after the order is sent, if it remains pending. If you prefer not to send a reminder, leave the selection set to None.
The Reminders section will only appear if 'Send to customer' option under Notification section is enabled.
Step 11: Select workflow automations
Choose which automations should occur when an order is paid or saved. Enable the following options depending on how you want orders to be handled once they are paid or saved:
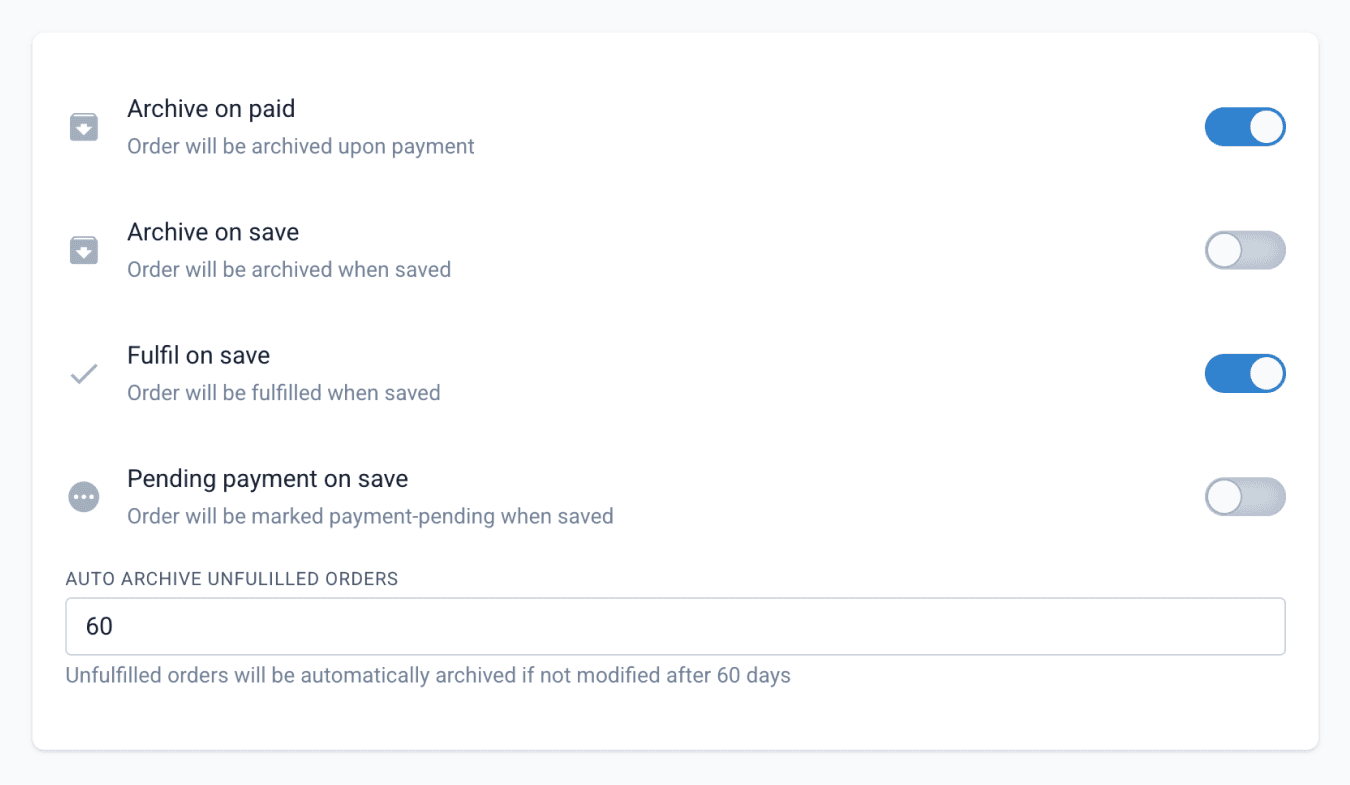
- ‘Archive on paid’ will automatically archive the order once payment has been completed.
- ‘Archive on save’ will automatically archive the order when it is saved.
- ‘Fulfil on save’ will automatically mark the order as fulfilled when it is saved.
- ‘Pending payment on save’ will automatically mark the order as payment-pending when it is saved.
- Enter the number of days before an unfulfilled order is automatically archived.
Step 12: Set up auto-tags
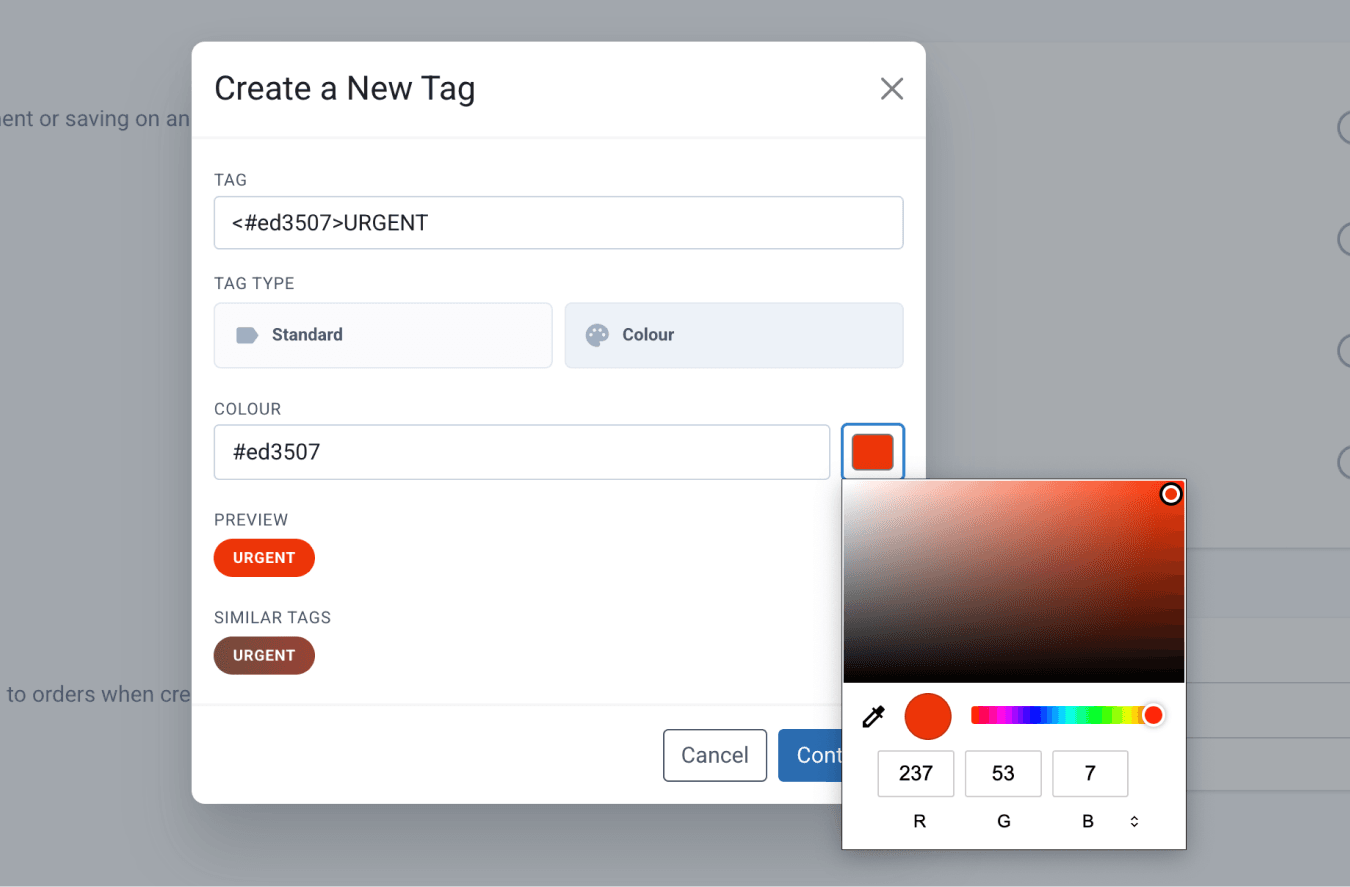
Add tags under Auto-Tag on Creation in your workflow. Any tags added here will automatically be applied to every new order created using that workflow. These tags will appear once the order is saved, not during the order build stage.

Step 13: Set up notification settings
If the selected payment method is Payment Link or Invoice Link, the Notification section will appear, allowing you to customise the email and SMS templates, contacts, and confirmation settings.
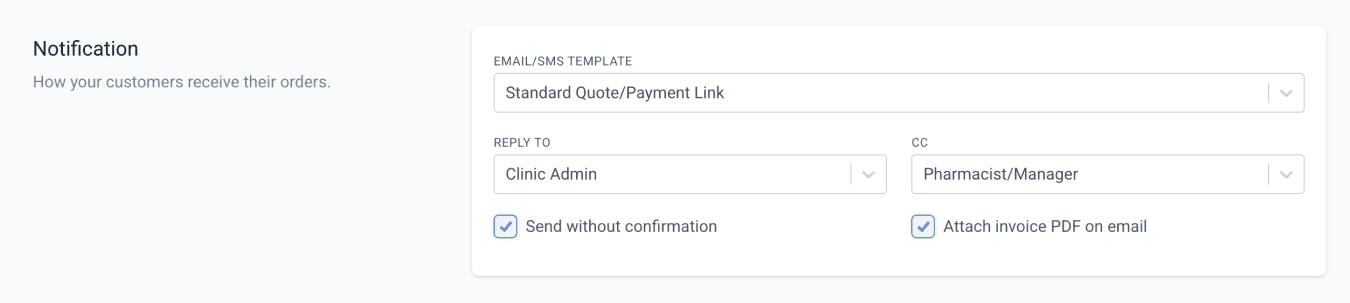
Select the appropriate ‘Email & SMS Template’ for this workflow.
Optionally, you may assign a contact person who will be set as the ‘CC’ or ‘Reply To’ recipient for sent links.
Enable ‘Send without confirmation’ to send the quote and payment link immediately, without displaying the Send Order Confirmation modal.
Tick ‘Attach invoice PDF on email’ to receive the invoice as a PDF attachment.
Step 14: Select a default order workflow
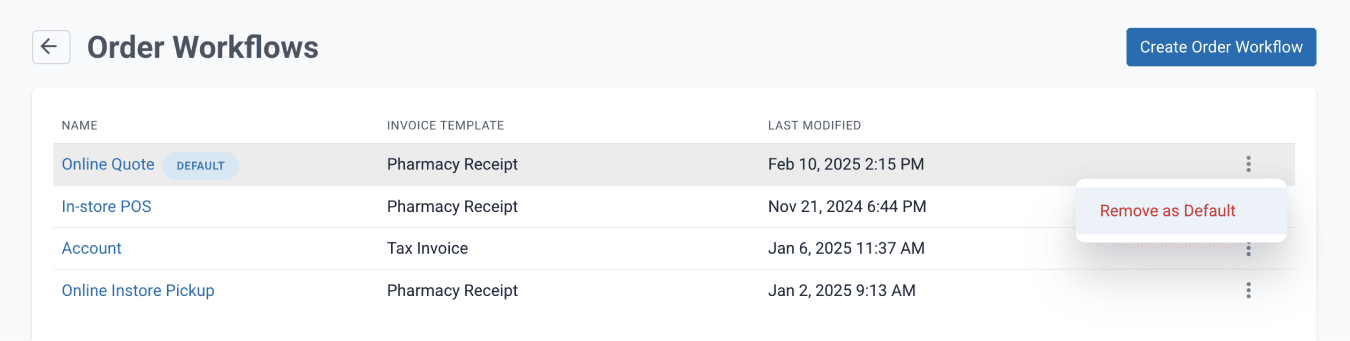
After configuring your order workflows, you may designate one as the default. The default workflow will be pre-selected when creating an order, which is useful for workflows used most often. To set a workflow as the default, click the three-dot icon and choose ‘Set as default’.
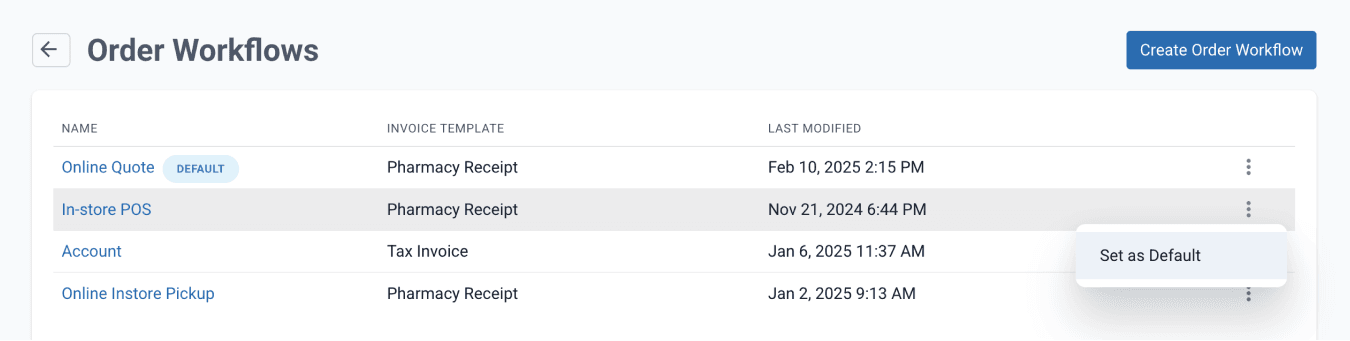
If no default workflow is selected, the last workflow you used will be pre-selected when you create your next order.
To remove a workflow as the default, click the three-dot icon and select ‘Remove as default’.
Overview of premium workflows
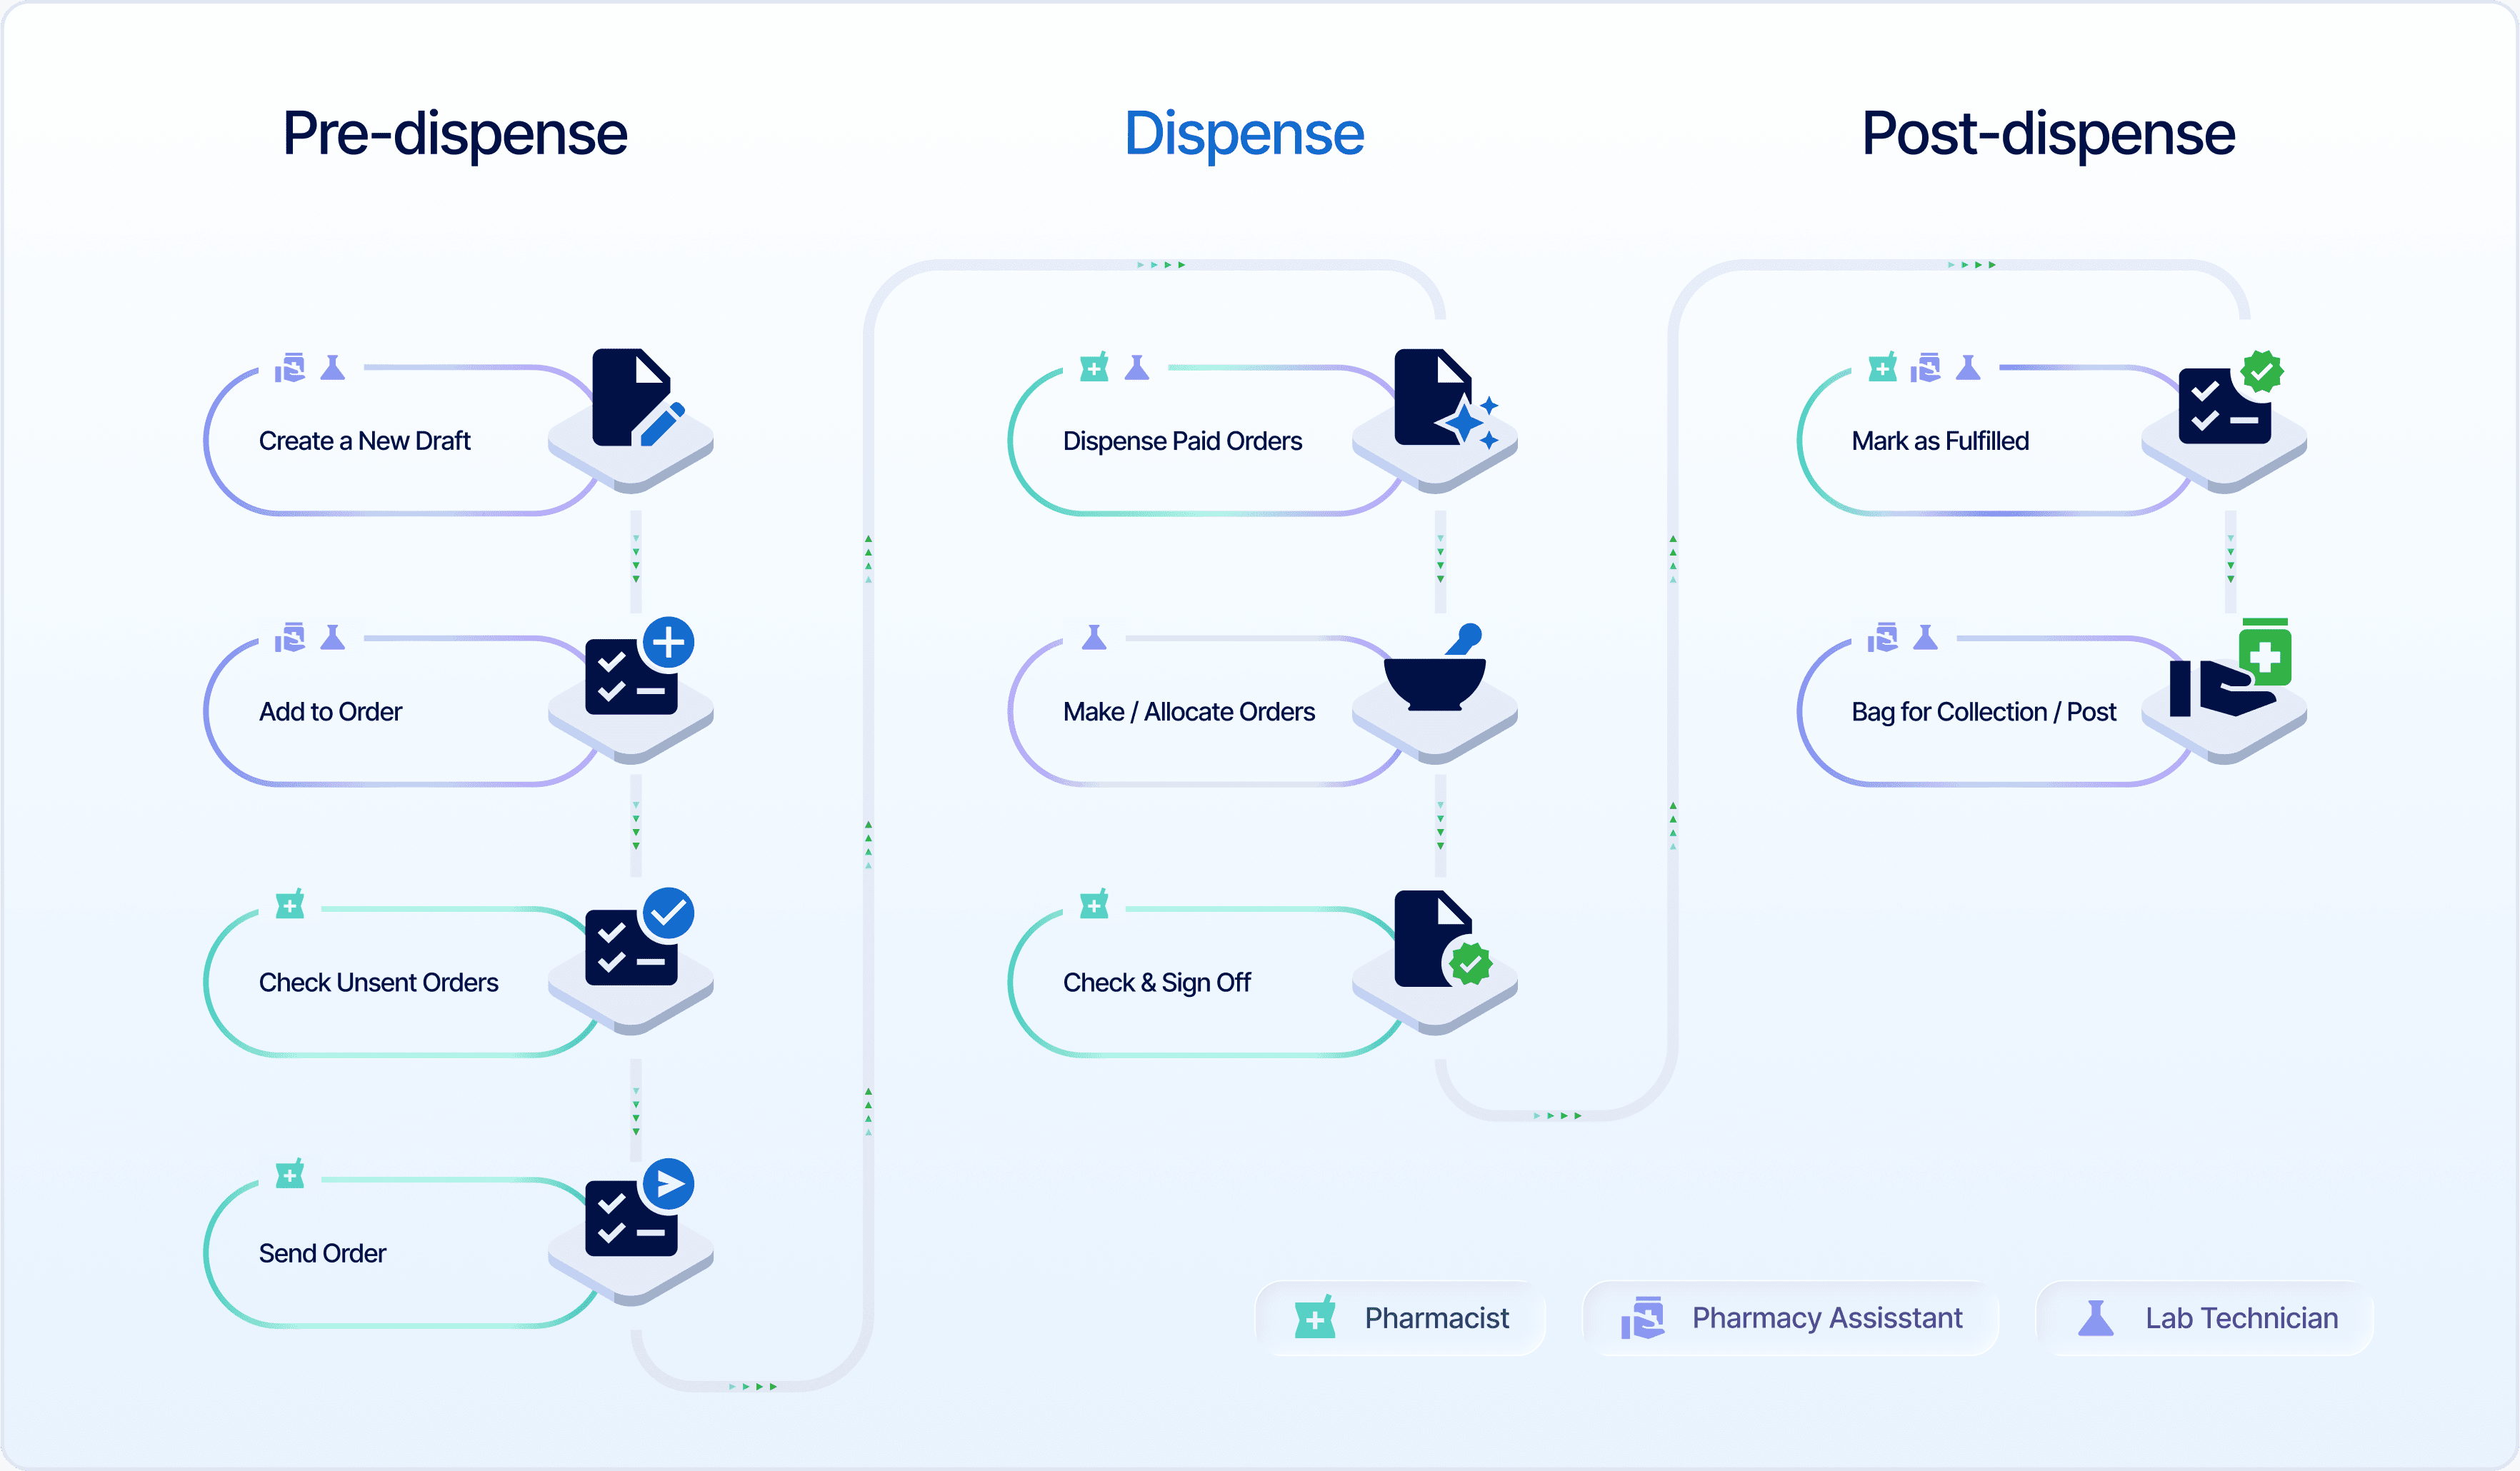
Now that you understand the key components of an order workflow and how each workflow is built step by step, it is helpful to see how these processes work in practice. The overall premium workflow is a strong example because it shows the complete path an order follows, from the initial draft through to post-dispensing tasks.
This workflow demonstrates how each stage is organised, how responsibilities are shared across the team, and how the system reduces manual steps. By guiding orders through a clear sequence, it supports accuracy, accountability and efficiency throughout the dispensing cycle.
Note: The tasks assigned to each role (PA, Technician, Pharmacist) may vary between pharmacies, except those that must be completed by a pharmacist. The setup described reflects a common approach used by premium sites.
Pre-dispense
In the pre-dispensing stage, the pharmacy assistant may create a draft from the Drafts page, enter prescription details, and review compound pricing. Drafts can then be added to an order or created automatically when starting a new order. From the Orders page, staff can search for formulations, batch stock, commercial drugs or products, select the correct workflow, and complete key details such as customer information, delivery method, and payment.
Risk assessment surveys may also be sent during this stage. Payments may be processed in-store, online, or through an account, and the pharmacist reviews and sends any pending orders.
Dispense
Once payment is completed and the pharmacist reviews the risk assessment, they proceed with the order and the customer is notified that their medication is being prepared. The technician then prepares and dispenses the medication, and the pharmacist checks and signs off the dispense record to ensure accuracy and compliance.
Post-dispense
After sign-off, the order is marked as fulfilled and an automatic message informs the customer that their order is ready for pickup or shipping. The technician or pharmacy assistant bags and prepares the order for collection or postage. Once the customer receives the order, it is marked as collected. This structured process supports clear responsibilities, reduces errors and delivers a consistent, efficient service for patients.
These stages may vary depending on the type of workflow you establish. Workflow types differ based on how the order is placed, whether in-store, online or through a clinic account, and each one may involve different processes for managing the order, taking payment, and arranging delivery.
To better understand how each workflow operates, we recommend reading the following blogs, which will help you understand, build, and use the workflow that suits your needs.
Use the guides below to configure clinic order workflows based on how charges and deliveries are handled:
- Workflow Setup Guide: Charge to Clinic – Send to Patient
- Workflow Setup Guide: Charge to Patient – Send to Clinic
- Workflow Setup Guide: Charge to Clinic – Send to Clinic
- Workflow Setup Guide: Charge to Patient – Send to Patient
To understand how these workflows streamline the order process for both in-store, online, and account scenarios, see our blogs:
Order Workflows in Action: Processing in-store and online orders
Accounts & Orders System: Managing pharmacy to clinic orders in Compound Direct
Summary
Order Workflows in Compound Direct streamline your pharmacy operations by automating and standardising order management across every stage, from quoting and payment to patient risk assessments and order delivery. Workflows ensure consistency, reduce manual tasks, and improve communication throughout the process. With a clear structure and automated system, Compound Direct workflows help your pharmacy operate more efficiently, minimise errors, and deliver a seamless, reliable experience for both staff and patients.
This blog explores the importance of order workflows in pharmacy operations, outlines the key components required to build an effective workflow, provides a step-by-step guide to creating one, and demonstrates how these workflows are applied in premium pharmacy settings.
All names and medical data shown in software screenshots are fictional and for demonstration purposes only. These figures represent fictional persons; any resemblance to real individuals is purely coincidental. Use of existing fictional names is for illustrative purposes and does not imply affiliation or endorsement.